As your organization grows and collaboration in your Office 365 environment increases, the amount of data generated also accelerates at a fast rate. If this is not managed properly, storage space will shrink rapidly and costs will rise quickly. In this post, we’ll go over Dux Raymond Sy‘s latest webinar where he breaks down “How to Reduce Office 365 Storage by 80% in 4 Steps.”
Why do we need to reduce storage?
Some might ask why they even need to reduce storage if their organization already pays a subscription fee to keep their data secure in the cloud. While cloud collaboration brings many benefits to the organization, not everything is unlimited; cloud storage has its limits too. That’s why we need to understand the key reasons why this is crucial to the business.
Key Reasons to Reduce Storage
Cost Reasons
Additional storage needs – Technically, in Microsoft 365, each subscribed user has a limit up to 5TB of storage for all their data, workspaces, files, documents, and more. Going beyond this limit costs extra. As the level of collaboration increases, the storage increases as well; thus, cost could eventually be an issue given that many enterprises have hundreds or even thousands of employees.
Unused accounts – When people leave the organization, their Microsoft 365 data will not be removed immediately. In fact, it will stay in the tenant unused. This includes their mailbox, documents, files, credentials, and more that continue to take up storage space.

Risk Reasons
Compliance requirement – It’s important to mitigate the risk and exposure of critical data in any organization. There are regulations such as GDPR that they need to comply with. Some of these regulations only allow sensitive data for a certain period of time. What will you do with such data? How will it be deleted properly? This unmanaged data might increase the chance of an attack that will then become a bigger issue.
Retention needs – While some of the data needs to be deleted properly, some needs to be kept for a longer period of time. It’s vital to keep track of what data needs to be retained for specific purposes.
These four key factors are the main reasons why reducing your Office 365 storage is so important. And here are the four steps for effective reduction and management.
Step 1: Cut Your ROT Information
Before you delete any data in your environment, make sure you delete redundant, obsolete, and trivial information. This is the data which you haven’t touched for many years, such as an old document you worked on seven years ago. You don’t need that anymore, right?
It could be cumbersome to manually check all your data and identify what to keep and what to retire, especially since you must first know where these files live. Aside from your Office 365 tenant, there are ROT files in your local folders and other locations. You can utilize available tools—some are even free—to help you identify this data in a very systematic way. Microsoft SharePoint Migration Assessment is a tool you can use to scan SharePoint, show all your data, and help you with ROT identification.
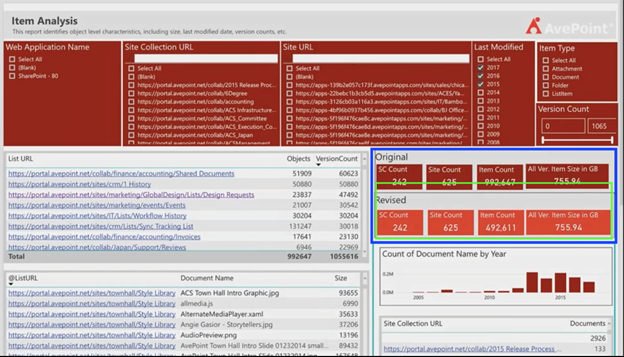
Another great tool to use for your ROI data is the AvePoint Discovery tool. You can scan your Office 365 environment, file share location, and SharePoint to show your total item count. This includes every file and document in your library. This tool will help you check files past your standard retention period and which files you need to keep to stay compliant while simultaneously reducing your storage consumption from unused and redundant data.
Step 2: Automate Lifecycle Management
Once you have managed your ROI data, it’s now time to proceed to the next stage of reducing your Office 365 storage: lifecycle management. This is a necessary task, yet one that can be a heavy lift for IT administrators if done manually since there are many workspaces to keep track of in Microsoft 365 including SharePoint, Microsoft Teams, OneDrive, and more.
In Microsoft Teams, for instance, end-users could just create Teams when they need them and add specific users or files to them. End-users can even create sites and subsites if they need to collect certain users for a project. However, this can grow into a larger issue if there’s no automation or governance in place. What will happen with these sites and Teams once their purpose has come to an end? They will be left unused, take up storage space, and increase risk exposure. Thus, one effective way to reduce your storage is to structure the lifecycle management of these workspaces. From provisioning to management to lifecycle, you can automate all of these processes to ensure that these workspaces will be aligned with your policies from creation up to deletion.
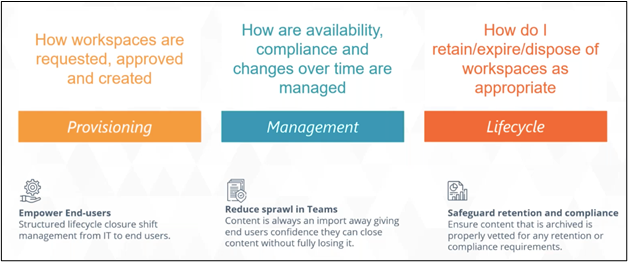
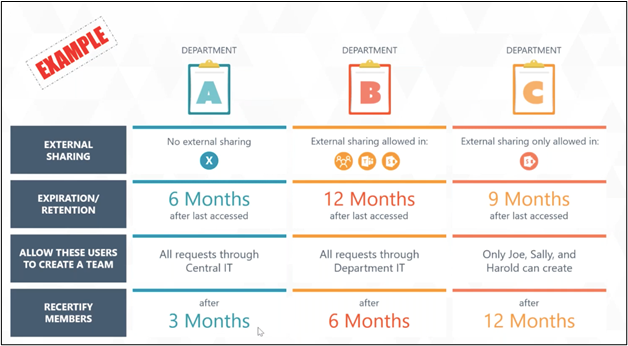
With AvePoint Cloud Governance, you can create policies and rules that can be used by your end-users when creating their workspaces. Not only that, but you can also determine how sharing, recertification, and expiration works in specific workspaces. You can even automate when these created Teams or SharePoint sites will expire according to your policies. Here’s a sample table on how Cloud Governance can help you automate lifecycle management with provisioning policies for your users.
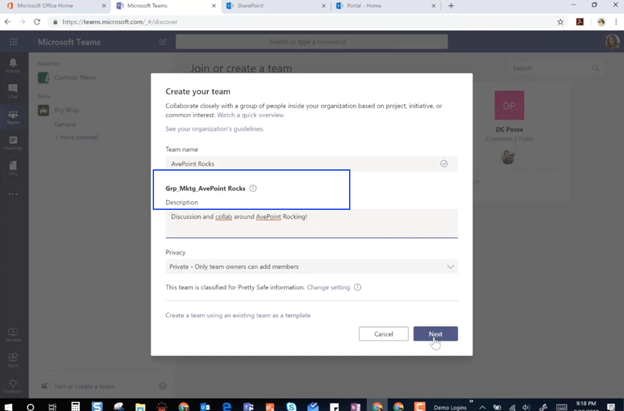
When a user tries to create a Team in Microsoft Teams, the naming convention can be standardized based on what policies you have in place. This will be beneficial for administrators to identify which Teams belongs to who. Afterwards, an email notification will be sent to the Team owner about the new creation.
Step 3: Adopt a Defensible Destruction Approach
After you get rid of ROT files and automate lifecycle management, you can then eliminate information in a quality control, legally defensible, and regulatory compliant way. When you delete a file, the standard retention policy of Microsoft is between 14-30 days. Past this period, all your deleted files will be permanently gone. When legal requirements arise such as audits and the data is already gone, there will be no way to retrieve it. Here are three ways to go about achieving a defensible destruction approach:
- Retention and Disposal Schedule – Some organizations just retain and archive information at scale without considering the individual bits of data. Unfortunately, retaining information that’s no longer useful can create more risk and lead to compliance failures. Hence, it’s very important to have a detailed retention schedule.
- Classification Scheme/Taxonomy – Another way of having a better retention process is by classifying your data. By incorporating metadata and tagging, an automated system will know when to delete data based on the metadata assigned. This can be too much work if done manually, which makes automated tagging solutions so useful.
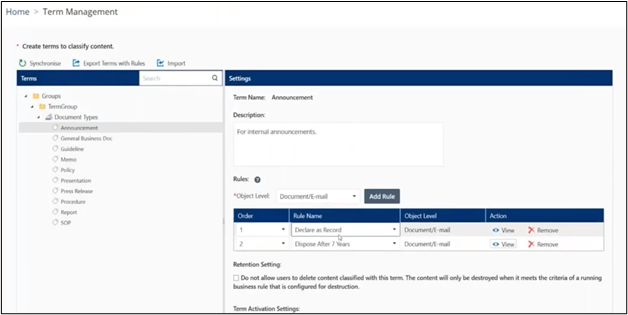
- Application of labels/terms to content – Another great tool for labeling your documents is AvePoint Cloud Records. It’s an easy-to-use application for Microsoft 365 that specializes in classifying your content for an automated retention policy. You can automate the labeling of your documents or allow users to manually assign labels. Based on the created rule, each label will have a corresponding retention rule that can automatically delete data after a set period.
Step 4: Back Up Content to Remove Inactive Accounts
The final step in reducing your Office 365 storage is to back up your content to remove inactive data. As mentioned above, one of the main reasons organizations often need to reduce storage is because inactive and unused data is unnecessarily taking up space.
One great example is mailboxes. You don’t need to keep the accounts of offboarded employees alive or share their mailboxes with other users to retain their data for future use since it can increase risk. Microsoft has a native way of applying retention to inactive accounts, though this doesn’t reduce the amount of storage it takes up.
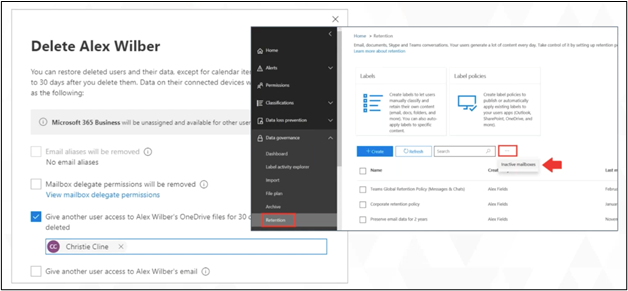
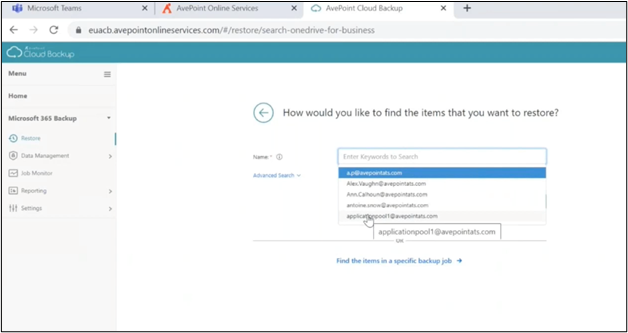
So, what do you need to do to reduce storage in this scenario? Adopting a third-party backup solution such as AvePoint Cloud Backup is one of the most effective and efficient ways to handle inactive data. Since everything is backed up with Cloud Backup, you can restore data from previous users anytime you need, including from mailboxes, OneDrives, and Teams through a very comprehensive dashboard. Not only can you retrieve data, but you can also restore it to a different location or account. This is a powerful way to restore versions of documents that many users are working on.
It’s very important to manage your storage before it becomes a burden. Hopefully these four steps can help you systematically reduce your Office 365 storage to lower costs and potential risk. Want even more details? Watch the whole webinar for free here!


