From convenient chat functionality to intuitive video conferencing tools, Microsoft Teams has proven itself to be a key part of effective collaboration in organizations. Aside from these communication features, Teams also elevates the collaboration experience by allowing users to easily exchange documents and files. In this post, let’s look at how you can properly work with files and document in Teams to maximize productivity.
The Challenge
Though file sharing in Microsoft Teams is powerful, it can be confusing for some users and may end up becoming a burden. Files are can get scattered everywhere, permissions can get neglected, and data security can become compromised. To avoid all of this, here are some of the basic file and document practices every Microsoft Teams user should know about.
DO: Share files with the proper permissions
DON’T: Share files with no permissions configured
As the owner of a document, you need to ensure its security. A crucial part of this is providing the correct permissions to whom you are sharing it with. To quickly share files in Microsoft Teams, go to the chat window and click on the paper clip icon to add your files. There should also be an option to share a file from OneDrive without leaving Microsoft Teams.
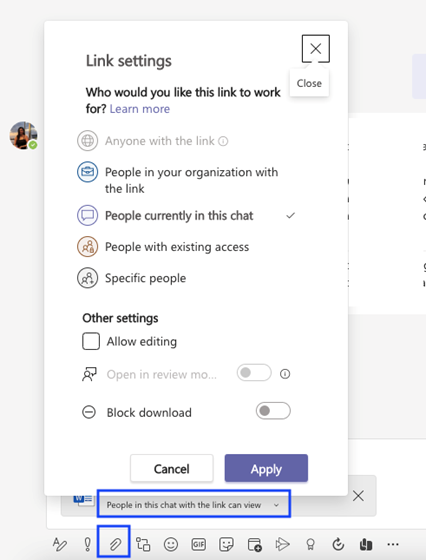
In the same chat window you can configure the permissions of the file you’re sharing. You can even choose between allowing editing access and viewing access, and there are various sharing options you can choose from.
DO: Directly create a document in the Microsoft Teams app
DONT: Create and share documents separately that might cause versioning issues
One of the common mistakes some users make when working on a document is having multiple versions of a file at once. Hence, changes are not tracked in real-time and collaboration becomes a challenge. To address this issue, Microsoft Teams lets you create new documents or work on existing ones from right inside the app. This includes Word, PowerPoint, Excel, OneNote, and more.
To proceed, go to the Teams tab from the main menu (left side of the app window) and find the group or Team you want to work with, then go to the Files tab.
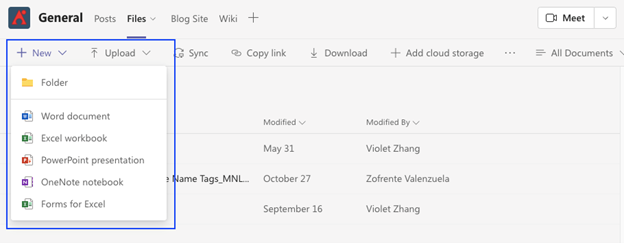
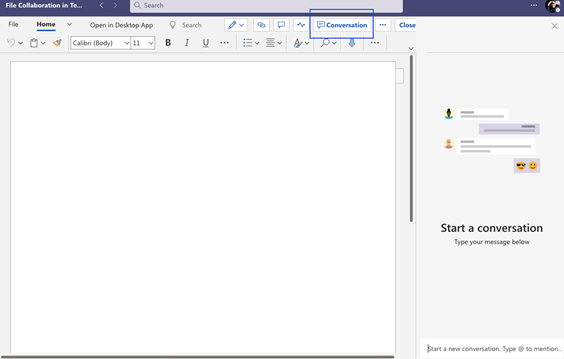
Next, choose the type of document you want to create. While working on the new document, you can start a conversation and chat with your team about the changes and updates while looking at the document together. This feature is especially beneficial in meetings because participants can work on the document and collaborate in the chat.
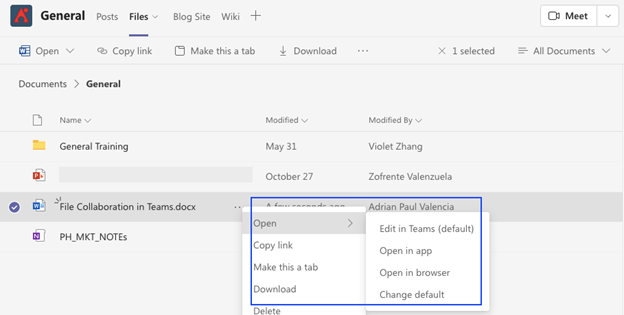
The newly created document will appear in the Files tab of the Team you created it in. Users can open the same document on the web, desktop, or inside the app and still track changes or even see what a user is doing inside the file.
DO: Create a shareable link from OneDrive and SharePoint
DON’T: Upload the file multiple times
As mentioned earlier, you can directly share a file from OneDrive in the chat box in Microsoft Teams. However, it’s not ideal to upload and share your document repeatedly. Instead, you can make a shareable link that you can send to your recipients.
If you’re working in OneDrive and SharePoint, you can go to the file, click “Share,” and create a link. Each link corresponds to a specific permission you have provided.
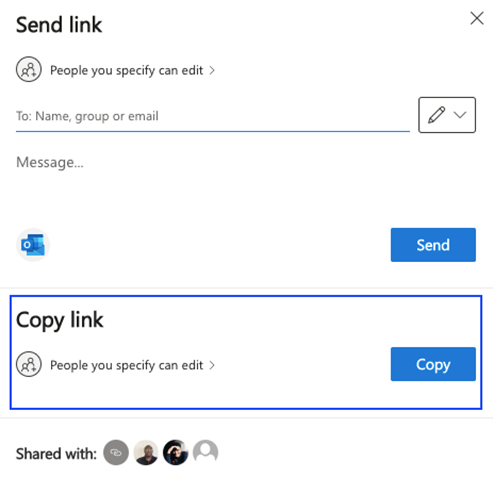
Once you have the link with the correct permission (again, you need to ensure the right permission is provided to the right user), you can just send them the link via Microsoft Teams. In this way, they can simply go back to the link when they need to access the file. There’s no need to reupload the document each time you share it.
File sharing and collaboration has never been particularly efficient, but these Microsoft Teams file sharing features make the process as intuitive as possible. Try these tips out and let us know how they work out for you!


