Guide: SharePoint and Flow Integration (Part 1)

See how beneficial SharePoint connector can be to your integration with Microsoft Flow. Try our 30-day free trial now!
Do you want to make SharePoint and Office 365 suit your company’s cadence? Learn how with our free webinar-on-demand!
Microsoft Flow has grown a lot since becoming generally available about a year and a half ago. There has been a lot of speculation regarding how Flow would eventually replace SharePoint Designer since it was announced that there would be no new versions of the software. With recent feature additions and roadmap announcements, though, it has become a lot clearer.
Microsoft Flow connects with hundreds of services, but since so many organizations have become reliant on automating business processes in SharePoint, this connector has received a lot of extra attention.
What is Microsoft Flow?
Microsoft Flow is a cloud-based app that launched in 2016 that allows users to create workflows between various apps and services to automate notifications, synchronize files, collect data and more. Users can do this by setting workflows to trigger when a desired event happens. People with an Office 365 subscription, or the business versions of Office 365 and Dynamics 365 get access to Flow and can test making an Office 365 flow today!
There are three different pricing models for Flow; Free, Plan 1, Plan 2. With the Flow Free plan you can create an unlimited number of workflows, but are limited to 750 runs per month with check-ins happening every 15 minutes. Flow Plan 1 and 2 offer more runs per month and more frequent check-ins for the workflows.

How Does Microsoft Flow Integrate with SharePoint?
When considering how SharePoint and Flow are integrated it is important to know that not only can custom flows be created using the SharePoint connector, but also that Microsoft Flow is now “baked into” modern SharePoint lists and libraries.
Even further native integration between modern SharePoint and Flow was announced at SharePoint Conference. In Part 1 of this two-part post on integration, we will walk through how Flow is natively built into the modern SharePoint list and library experience.
Request Sign-Off
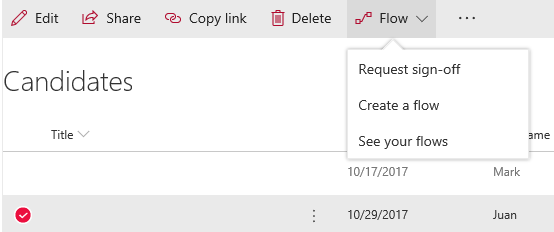
Microsoft Flow provides a simple way to request approval of a SharePoint list item or a document in a library. When you select an item in a list then click on the Flow drop down menu you will see “Request Sign-off.” When “Request Sign-off” is selected you then choose the person from your organization that should receive the sign-off approval and write an accompanying message.

Note: When you use the “Request Sign-Off” feature for the first time on a list you will need to click the “Create Flow” button to add the flow. Once the flow is created a field called “Sign-off Status” will automatically be added to your list.
Check out this guide on SharePoint and Flow integration!Click To Tweet
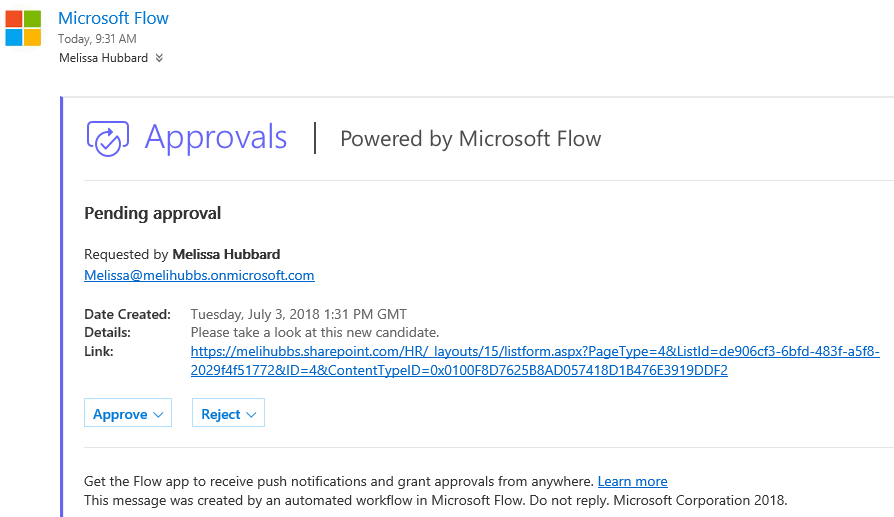
Once an item is sent for an approval sign-off, the “Sign-off Status” field will show as “Pending.” The person that was entered to receive the sign-off approval will receive an email with the message as well as a link to the item. They will also see the approval in the Flow Approval Center. If they have the Flow mobile app they will receive a notification.

The approver can approve or reject from the email message, Flow Approval Center, or the mobile app. If they approve the value of the “Sign-off Status” the field will appear as “Approved” and if rejected it will appear as “Rejected.”
Warning: This feature cannot be turned off. Also, there is no way to limit who the user selects to send the sign-off to. The name of the person who approved or rejected is not saved anywhere on the list.
Create a Flow from a List or Library
Flows connecting to a modern list or library can be created right from the Flow drop down. Anyone who can add and edit items on the list or library will have the option to create a flow. When you select “Create a flow” you are presented with flow templates that have a SharePoint trigger.

Many of the templates connect with other apps besides SharePoint. If none of the templates meet your business need, there are templates that allow you to add a custom action that runs when a new item is added or an item is modified. There is also a template that allows you to have a custom action run on an item selected.
The functionality of flows that run on a selected item is similar to the “Request Sign-off” flow in that you need to select a SharePoint list or library item and then select the flow from the dropdown menu.
Once you select a template, you will be brought to the Microsoft Flow site where you will work on and complete your flow. You will notice that the SharePoint site and the list or library that you created the flow from is automatically selected for you.

Future Flow and SharePoint Integration
The integration between Flow and SharePoint is expected to get even deeper. Here are a few of the most important Flow and SharePoint-related announcements from SharePoint Conference 2018:
- Built-in Flow actions to invoke cognitive analytics in list data. Cognitive analytics allow for there to be a sentiment analysis of content to determine if there are positive or negative feelings being expressed in text.
- Ability to automate the labelling and disposal of documents for retention purposes.
- Out-of-the-box approval flows for publishing pages.
Stay tuned for Part 2 where we will discuss the SharePoint connector in more detail and draw some comparisons between Flow and SharePoint Designer workflows.
Like what you read? Be sure to subscribe to our blog for more great content from industry experts.
Melissa is an AvePoint blog contributor and currently serves as a Project Manager with Withum Digital.


