Managing your user accounts may seem like one of the most mundane Office 365 admin tasks, but the efficiency of how you do your user account management actually affects the overall governance, costs, and security of your entire Microsoft 365 environment.
Not having a clear process on how you add users or remove employees may compromise your collaboration and security practices. Adding the wrong licenses can lead to unnecessary license costs and impede productivity without access to proper Microsoft services.
In this blog post, let’s go over all the important aspects you need to take into account for an efficient and holistic approach to user account management so you can ultimately spur confidence in your collaboration.
First, where can you manage?
Office 365 user management settings can be accessed through three main entry points. However, there are differences in limitations for each of the portals, so be sure to use what works best for your organization:
- Microsoft 365 Admin Center: Usually the main hub for all of your user account management settings, most especially for those whose users are entirely in the cloud.
- PowerShell: Allows configuration for bulk settings like adding users, assigning licenses, etc.
- Azure Active Directory: Central user and identity setting platform for hybrid environments.

Office 365 User Account Management Checklist
Because a user needs access to several Microsoft services as well as collaboration documents, setting up the right configuration can help you maintain security while promoting productivity.
Let’s go over your main tasks as an Office 365 tenant admin as you manage your Office 365 users.
1. Adding Users
Whether you’re moving to a new tenant or simply adding new employees, creating new users can be a tedious task, especially for large organizations or those handling Office 365 multi-tenant administration.
- Adding individually: In the Microsoft 365 admin center or Azure Active Directory, you can manually add each of your users and configure their details.
- Fill in user details: first and last name, username, and display name.
- Choose the right domain.
- Configure password settings: use an autogenerated password or create a strong one.
- Select user location.
- Assign licenses (choose which apps you want to allow/limit the user to have access to).
- Assign admin roles, if necessary.
- Give the user their new credentials, with instructions to change the password once signing in and after 90 days.

- Adding in bulk: For large organizations with multiple users that need to be onboard frequently, you may need to learn PowerShell scripting or utilize CSV if you don’t want to waste your time doing the same work repeatedly.
- Prepare CSVs with the accurate details of multiple users. Import it in the Microsoft 365 admin center, then set the sign-in status and choose the license to assign to all the users in your list.
- To automate the entire user account creation process, including sign-in status and license assignments, you can use PowerShell.
- If using the Azure Active Directory, you can leverage Azure Connect to sync user details in Microsoft 365.
2. Managing Existing Users
As you grow, there will be adjustments to your user accounts. Employees will get promoted and some will need access to more services. As security threats increase, there will be a need to intensify security practices as well.
- Basic changes in user details in the Microsoft 365 admin center or Azure AD:
- Edit a user’s name
- Change a user’s email address and set a new primary email address
- Change the display name of a user
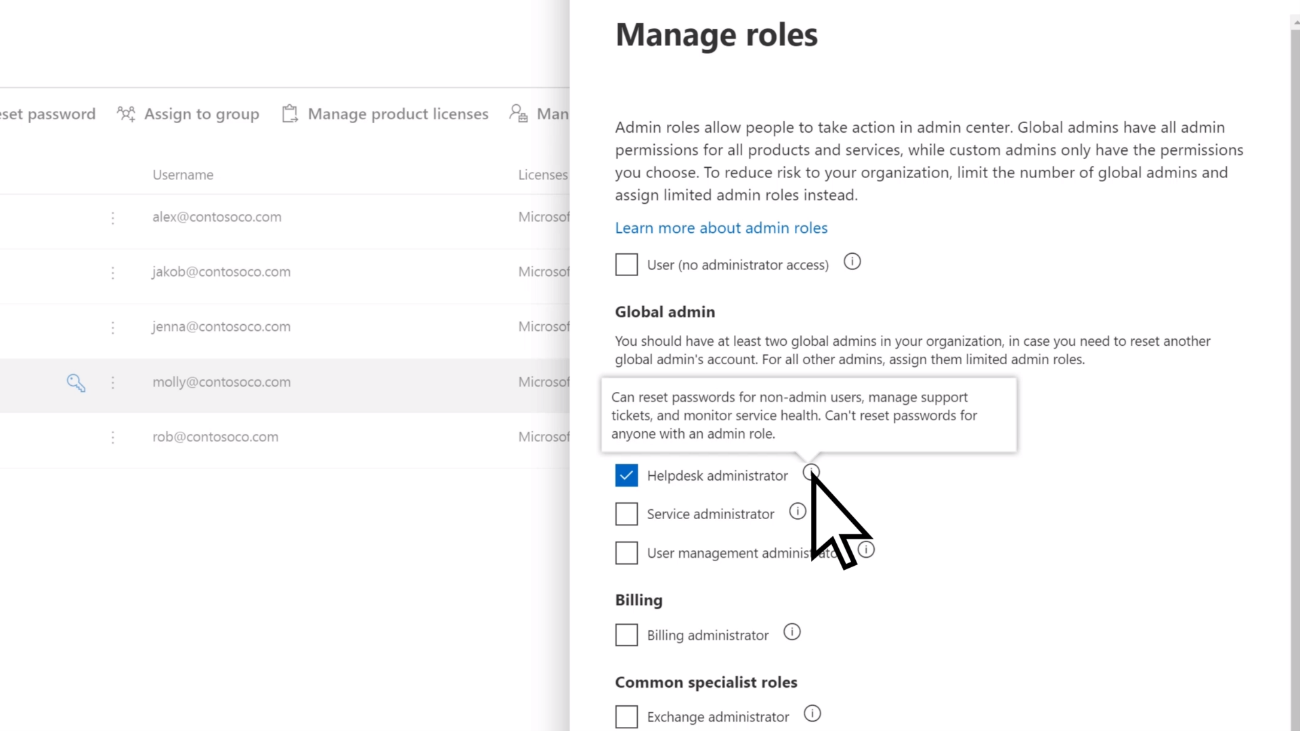
- Assign admin roles to an existing user:
- In the Admin Center, either:
- Go to the user’s details and assign a role through the Manage Roles pane, or
- Go to Role assignments and add the user/s in the Assigned Admins window
- In the Admin Center, either:
- Use PowerShell if assigning multiple admin roles to multiple users
- Manage licenses to update or downgrade apps and services your users have access to using one of these options:
- Assign licenses to the Billing page in the admin center
- Add multiple Microsoft 365 licenses to several user accounts with PowerShell
- Use group membership in Azure AD to grant access to multiple users
- Configure and set your password system security:
- In the Microsoft Admin Center:
- Reset and resend passwords and turn off strong passwords in the Active Users tab
- Let users reset passwords and set the password expiration policy in the Security and privacy tab
- Using Azure AD PowerShell for Graph, you can set passwords to never expire
- Configure multiple users’ password settings with PowerShell
- In the Microsoft Admin Center:
When assigning admin roles, make sure to go over your password system requirements for admins to maintain and strengthen security against unwanted control and access over your environment.
3. Configuring Guest User Settings
Guest sharing is turned on by default to your organization and the settings can be configured in Azure AD:
- Basic guest user configuration:
- Add the user and assign a license
- Add guest user’s membership to groups to give access to your Microsoft services such as Teams, SharePoint sites, and Microsoft groups
- Configure guest user’s access to your organization files and folders
- Remove guest
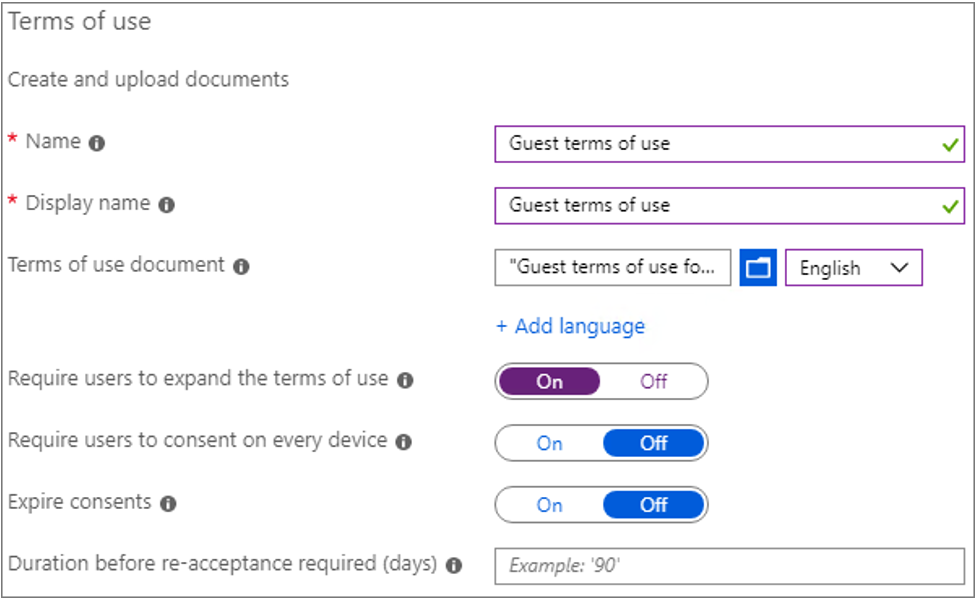
- You can further set up a secure guest-sharing environment in Azure AD:
- Set up authentication, terms of use, and quarterly guest access review
- Assign sensitivity labels and create sensitive information types for documents for highly sensitive projects
In managing guest users, you need to closely work with other admins–a SharePoint tenant admin, for example–to ensure security between integrated apps so that no sensitive data is being shared maliciously.
4. Managing Groups
Microsoft 365 Groups enable you to conveniently assign access to your Microsoft resources to multiple users at once.
By creating the right type of group, you can automatically assign licenses to or provide access to collaboration resources to groups of people; users from the same department, for example.
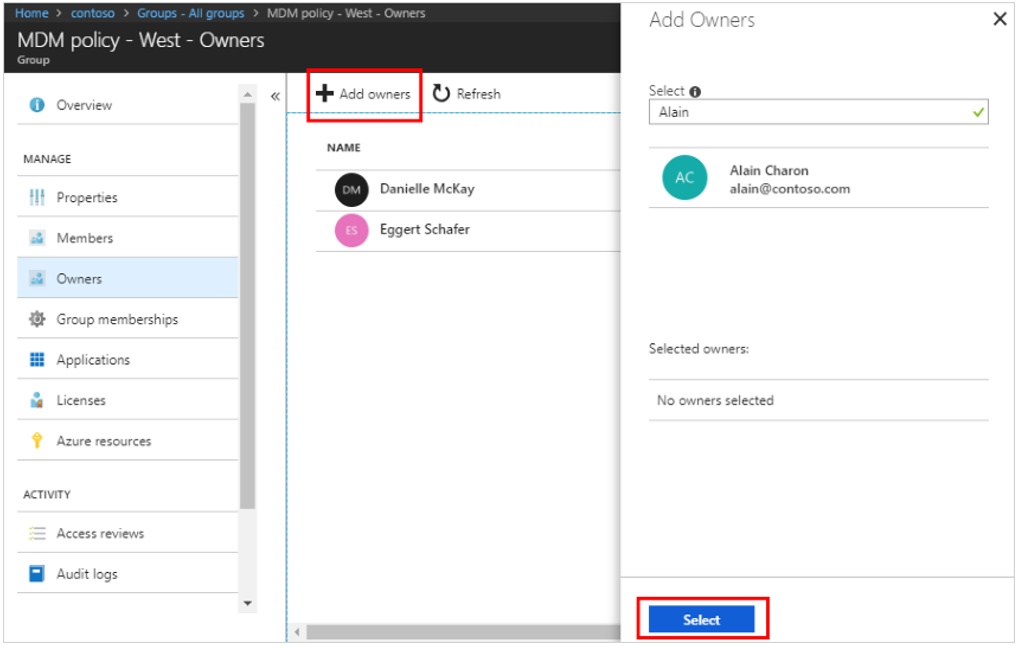
Groups also have different purposes, so creating the right group with proper management and governance is key. In the Microsoft 365 Admin Center, you can:
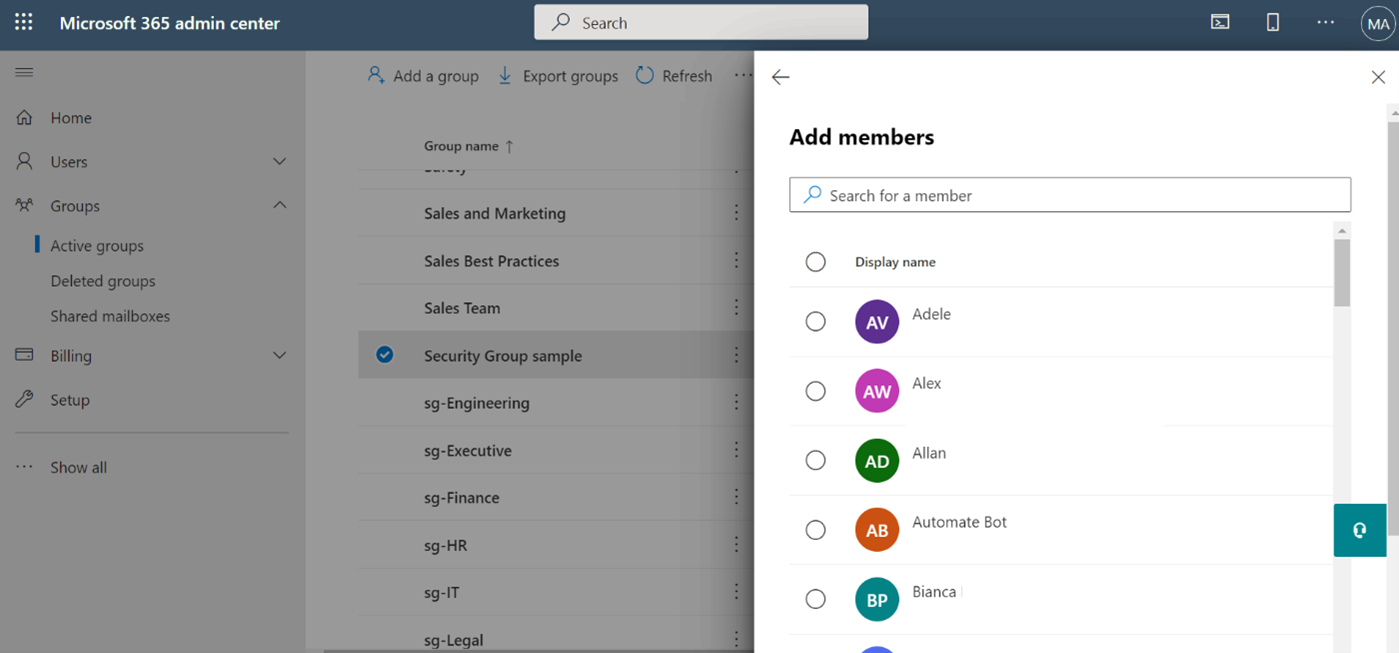
- Create groups and manage group settings
- Add members and assign group owners to your groups
- Manage guest access to your groups
- Restore deleted groups
With PowerShell, you can permanently delete your Microsoft 365 Groups once they cease being useful.
5. Removing Employees
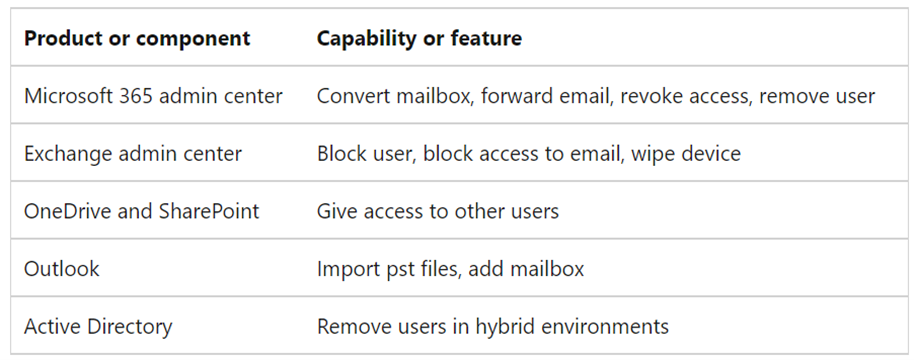
When an employee leaves your organization, you need not only remove their license, but you also have to make sure you block their access to your environment as well as secure the data they left.
To go over your offboarding process, you’d need to leverage capabilities in different Microsoft services:
Still sounds like a lot of work? Instead of constantly going over these tasks, you can take advantage of the automation third-party tools can provide.
AvePoint’s Cloud Management, for example, can help you centrally manage your Microsoft 365 environment by bringing automated management tools that provide insight and control over your Office 365 workspaces.
Want to see how it works? Request a demo and learn how you can cut down on unnecessary license costs.

