The following are excerpts from Matt Wade and Sven Seidenberg’s new ebook Rockstar Meetings in Microsoft Teams. Click here to get your free copy!
Microsoft Teams is a chat- and conferencing-based workspace app that comes as part of an Office 365 subscription. It’s meant to facilitate ongoing collaboration and communication occurring among any team, project, organization, or group of people. Teams provides single-point access to conversations, files, notes, tasks, and, most relevant here, online meetings.
Online meetings have been important in the world of employees and students who work and learn remotely as early as the late 1990s, but their use has been especially critical as employees have been forced to work remotely during the COVID-19 pandemic.
Matt Wade has teamed up with AvePoint and contributor Sven Seidenberg to create a guide that covers the how-to, tips and tricks, and everyday etiquette for using Microsoft Teams to conduct great online meetings. These guidelines are meant to be a starting point and won’t be perfectly applicable to every organization, but they should serve as a strong foundation for your organization to build off of.
Read on for a quick taste of the tips and images you can expect to find in the full ebook, and if you want more, you can access Rockstar Meetings in Microsoft Teams here.

Content Preview
Chapter 1: Some Big Picture Tips
A pair of headphones goes a long way.
Wired or Bluetooth headphones will make the sound experience better for everyone. Make sure to choose the correct speaker and microphone when joining your meeting.
Make use of the whole Office 365 suite.
Teams incorporates multiple Office 365 apps: use OneNote to take notes or minutes, share and edit documents in SharePoint, create follow-up actions right in Planner. Learn more at jum.to/Groups…
Chapter 2: It’s Not About the Tool
Share background information and resources ahead of the meeting.
Ensure everyone has access to all reading materials, presentations, and numbers before the meeting. Post them in your Team, perhaps as tabs, or link to a folder of meeting resources in the meeting description…

Chapter 3: Finding the Right Meeting Time
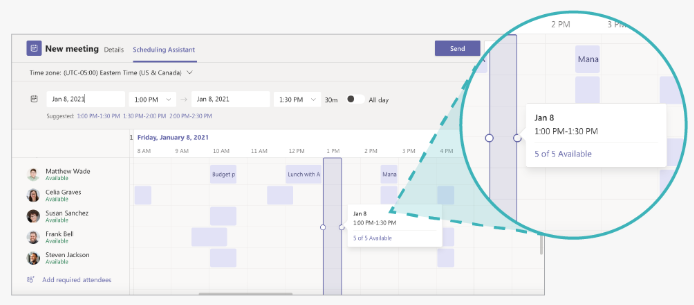
Use Scheduling Assistant for internal meetings.
You should be able to see your colleagues’ availability through Scheduling Assistant (shown above) so you can avoid times when they’re booked. It’s no different than the feature in Outlook…
Ready to turn your meetings up a notch? Read the full ebook here!

